Creating a working calculator in Flash using ActionScript 3 can be done fairly quickly if you know your way around AS3. If though, you are like me and you are still learning, it can often take a lot of research. Hours in fact. Here is a short article on how to add numbers to the end of a textbox string when a button is pressed:
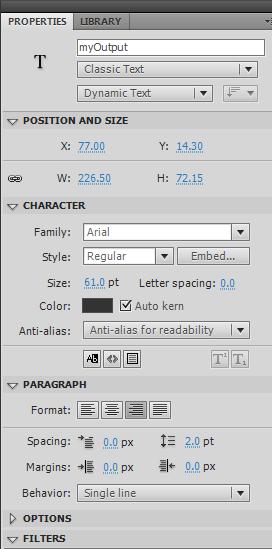
The first thing that you will need to do is create your output display (where your numbers will show). This can be done easily by inserting a text-box and setting its type to ‘Dynamic’. We do not want this to be selectable as this is going to be edited by our input buttons. See the image for the complete text-box settings. Call your text-box ‘myOutput’.

Text-Box Settings
You will then need to create your buttons, I am going to assume that you know how to create buttons in Flash. Create a range of buttons with numbers on (usually 0-9). For the sake of being able to use my code, call your buttons ‘Button_0’ to ‘Button_9’. Next, right click on the first frame of the timeline and click on ‘Actions’
The ActionScript 3 code that you will need to insert will control what the buttons do when pressed and what the output display should, well, display.
Enter the first part of the code like so:
var OutputValue : Number = 0;
This piece of code is declaring that we want to create a variable called ‘OutputValue’ that currently has the value of zero. This means that the code will use a piece of your computers memory to store the value of our variable ‘OutputValue’. This is useful because, with a little maths later on, we can manipulate the value.
Next, we need to think about how a calculator display actually works. What happens when you press a number on a calculator and then press another number? Is the number just stuck on the end to create another number? Not exactly. When you enter a number on a calculator, let’s say the number 5 for example, the display shows the number 5. Easy enough. When you press a second number, what actually happens is that the first number (5 in our example) is multiplied by 10 and then the value of the number pressed is added.
For example, we already have 5 on the display, we then want to press a 6 so that the value reads 56. The formula would be: (original number *10) + 6, in this case.
5 * 10 = 50
50 + 6 = 56
Make sense?
So that’s what our buttons need to do. They need to manipulate the ‘OutputValue’ number by taking the contents, multiplying by 10 and then adding the value for that specific number. So let’s add some more code.
For each button you have, add the following code:
Button_1.addEventListener(MouseEvent.MOUSE_DOWN, AddZero);
function AddZero(e:MouseEvent):void{
OutputValue = (OutputValue * 10) + 1;
myOutput.text = String (OutputValue);
}
Lets take a look in detail.
Line 1 is a simple command for adding an ‘EventListener’ to a button. This means that the program will listen for the event of the button being pressed, and execute the function titled ‘AddZero’.
Line 2 begins the function titled ‘AddZero‘ that kicks on when the button is pressed.
Line 3 is the first part of our function. When the button is pressed, we want the value our ‘OutputValue’ number to be changed. In the example above, we are using the ‘number 1’ button so the function is saying that, when the button is pressed, take the current value of our variable (OutputValue), multiply it by 10 and add 1. The function then stores this new number in place of the old number. So our variable, ‘OutputValue’, has been replaced. If you were to press the button twice, it would do the same again, starting off with the new, updated value of ‘OuputValue.
Get it?
Line 4 is very improtant. This line basically asks the function to display our value stored in ‘OutputValue’ and display it in our textbox that we called ‘myOutput’.
It is that simple, if you enter this code and change the button name so that you have one for each button, then you will have a working display that changes when you add a button.
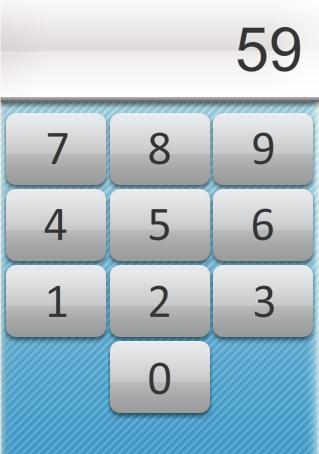
This is what my example looks like:
There are many other things to do if you are to make a fully working calculator. You will need a clear button, you will need a decimal point button among all the different multiplication and divide functions etc. But hopefully this will be a good base for you. See the file below for my full code. Remember to make sure that the names of buttons and text-boxes etc match up to your own if you are going to use it.
Code Document – Number Input Panel
Chris 😉


Discussion
No comments yet.